How to Present Your Architectural Renderings to Clients: Best Practices
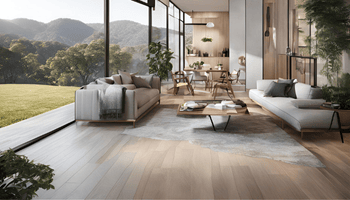
Presenting architectural renderings to clients is more than just showcasing design visuals; it’s about effectively communicating your vision. Whether you’re displaying a 3D rendering, floor plans, or exterior designs, the way you present these visuals can significantly impact how clients perceive your work. Clear and engaging presentations help clients understand complex designs and feel more confident in your proposal.
In this article, we’ll cover the best practices for presenting your architectural renderings to clients. You’ll learn how to organize your visuals, explain design elements in simple terms, and create a story around your project that resonates with your audience. We’ll also discuss the importance of client feedback and how to address concerns constructively.

Best Practices For Architectural Renderings
Here are some simple tips to follow:
Do you want to visit Char Dham? Char Dham Travel Agent is the best place to plan your Char Dham tour. You can book the tour from here.
- Choose the Right Lighting: Proper lighting makes your rendering look more natural. Use sunlight for exterior renders and balanced indoor lighting for interiors.
- Use Realistic Textures: Textures like wood, stone, or tiles should look realistic. Pay attention to how materials behave under light, like how glossy or rough they appear.
- Set the Right Camera Angle: A good camera angle helps showcase the building’s design. It should capture important details without distorting the proportions.
- Add Realistic Environment: Include surrounding elements like trees, cars, or people to give context to your design. This makes the rendering feel more connected to its environment.
- Focus on Details: Small details like furniture, plants, or even reflections in glass make the rendering feel alive and more believable.
- Adjust Colors Correctly: Keep the colors balanced. Don’t use overly bright or dull colors, and make sure they match the real materials used in the project.
- Optimize Render Settings: Use the right settings for quality without overloading your system. A high-quality render doesn’t always need the most complex settings.
- Keep the Scene Clean: Don’t clutter the render with too many elements. Focus on the architecture, and avoid distractions in the background.
How To Organize Your Renderings?
Here’s a simple way to organize them:
Create Separate Folders
Start by creating specific folders for each project. If you’re working on different buildings, name the folders after each building (e.g., “Project A—Residential House”).
Inside the project folder, you can create subfolders like:
Would you like to visit Indiar? A tour operator in India is the best place to plan your tour. You can book a tour from here.
- Plans and Elevations: For basic 2D drawings.
- Exterior Renderings: For all outside views.
- Interior Renderings: For views inside the building.
- Landscape Renderings: For outdoor surroundings like gardens or parking areas.
Name Your Files Clearly
Use clear names for your renderings. Instead of “IMG123.jpg”, name your files based on what they represent, like “Exterior_Front_View_Daytime.jpg” or “Living_Room_Angle_1.jpg.” This makes it easy to find the right file later.
Add Dates or Versions
If you have different versions of the same rendering, include the date or version number in the file name (e.g., “Exterior_Front_View_v1.jpg” or “Living_Room_October2024.jpg”). This way, you can keep track of changes.
Use Consistent File Formats
Stick to standard formats like JPG, PNG, or PDF for images and presentations. This helps avoid confusion when sharing with others.
Would you like to visit Haridwar? Travel agents in Haridwar are the best place to plan your trip. You can book your tour right here.
Create a Master Folder
If you have multiple renderings for the same project, you can create a “Master” folder. This is where you place final, approved versions of your renderings for easy access.
Backup Your Files
Always keep a backup of your work, either on an external hard drive or cloud storage. This makes sure you don’t lose important files.
How To A Create Story That Resonates With The Render?
Creating a story that connects with a 3D render can make your visual more powerful and engaging. Here’s how you can do it in simple steps:
- Understand the Purpose: Before you start, think about why you’re creating the render. Is it for a home design, a commercial space, or a product? Knowing the purpose helps you shape the story around what the render represents.
- Know Your Audience: Who will see your render? Is it a potential buyer, an architect, or a homeowner? Tailor your story to what they care about. For example, a homebuyer might connect with how cozy and welcoming a living room looks.
- Focus on Emotion: A story that resonates often taps into emotions. Think about what feelings you want to evoke. Should the viewer feel calm, excited, or inspired? Use elements in your render, like lighting, colors, and textures, to support these emotions.
- Highlight Key Features: Every render has important details. In a kitchen render, for example, the sleek countertops or spacious layout might be key. Build your story around these features, explaining why they matter and how they add value.
- Keep It Simple: Your story doesn’t need to be complex. It can be as simple as describing a day in the life of someone using the space. For instance, “Imagine starting your day with the sun pouring into this bright and airy kitchen.”
- Show the Bigger Picture: Help your audience see how the rendered space fits into a larger context. For example, if you’re rendering a home, talk about how it fits into a family’s lifestyle or how the design promotes comfort and relaxation.
- Use Natural Flow: Let your story flow naturally with the render. If the scene is a peaceful bedroom, use soft, calming language that matches the mood of the space.
The Final Notes
In conclusion, presenting architectural renderings to clients successfully requires clear communication, engaging visuals, and a well-organized approach. Focus on what the client wants by highlighting how the design meets their needs.
Use high-quality renderings that show key details and offer different views, such as animations or virtual tours, to make the experience more engaging. Keep explanations simple and easy to understand, and encourage feedback to keep the client involved in the process.


